Kegerator
I've been homebrewing for a couple of years now, and my least favorite part of the whole process is definitely the bottling. Each 5 gallon batch has approximately 55 bottles that you have to clean, santize, fill, cap, clean again, and put in boxes. I've gotten sick and tired of doing that for every batch of beer, so I decided to make the jump and build myself a kegerator.

Building a kegerator is fairly simple, only requiring some plumbing and woodworking. The only hard part is the cost. Below is the cost for a three-keg setup similar to my current two-keg setup.
Updates
Feb 20, 2011
Got the kegerator built yesterday minus a temperature controller. I got a little drill-happy and accidentally made three faucet holes instead of two. Oops, I guess I'll have to put in that third faucet.
Links
Bill of Materials
| Qty | Cost Each | Item |
|---|---|---|
| 1 | $198 | GE 7.0 cubic ft freezer |
| 1 | $90 | 5 pound CO2 tank |
| 1 | $75 | Dual gauge CO2 regulator |
| 1 | $47 | 3-way CO2 distributor |
| 3 | $40 | Used 5 gallon soda keg |
| 3 | $6.50 | Ball lock gas disconnect - MFL |
| 3 | $6.50 | Ball lock liquid disconnect - MFL |
| 7 | $1.30 | 1/4" barb-to-MFL connector |
| 7 | $0.25 | Flared nylon washers for MFL connections |
| 3 | $20 | Stainless steel faucet shank |
| 3 | $2.25 | 1/4" barbed shank tail piece and hex nut |
| 3 | $0.10 | Rubber shank washer |
| 3 | $31.50 | Perlick beer faucet |
| 3 | $2 | Economy tap handle |
| 1 | $6.42 | 12' 2x8 |
| 1 | $3.37 | Roll of weather stripping |
| 2 | $5.65 | 25' roll of poly ice maker tubing |
| 14 | $0.65 | 1/4" to 1/2" hose clamp |
| Total | $758.09 |
Construction
By far the most popular way to build a kegerator outside of complete fabrication is to take an existing chest freezer and add a collar between the freezer and the original lid. This is what I did as seen below.
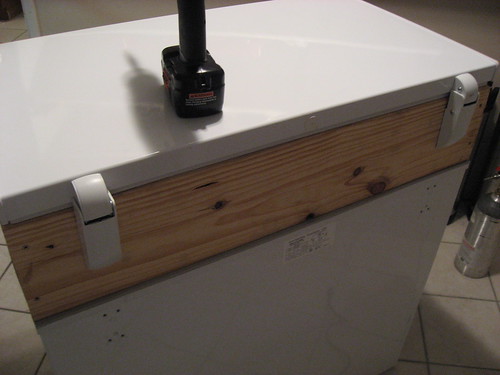
An added bonus to the collar method is that you now have a wooden platform to add your faucets and other items without harming the original freezer, in case you decide to sell it later or actually use it for storing food. When building the collar, you'll want to use something like a 2x8 to have enough clearance for the old hinges to attach to the wood.
To help keep the cold air in the kegerator, it's a good idea to seal the collar. I just put some weather stripping down where the collar rests on the freezer and filled the collar joints with some extra oil pan sealant I had laying around. The weather stripping is nice because if you're not quite a master woodworker and can't be bothered to get the collar exactly square, it helps fill in your gaps.
Once the collar's on and the faucets are installed, it's just a matter of connecting everything. Don't forget to use your washers to get a good seal! You can hand-tighten the MFL connections, but it might be a better idea to tighten them with a pair of pliers.
Pressure Testing
Once everything's together, you'll want to pressure test the entire dispensing system. What I did was fill the kegs with water and pressurize the whole system, and do some test pours. If you have any leaks, you'll either hear air hissing or see water leaking out.

In the case that it is an air leak and you're not sure where it's coming from, disconnect things one by one until the hissing stops. The part that you last disconnected is the faulty one, so make sure that everything's tight on there, especially if it's a hose clamp on a barbed connection.